
Monday, November 29, 2010

Flourless Peanut Butter Cookies & Gluten Free Oatcho Cookies

I'm a pregnant lady on the prowl for sweets and, oh, how I've missed the taste of cookies. The last cookie I ate was an Oreo and that was over 250 days ago! Yes, I'm counting.

Last weekend, I decided it was time to end the no cookie madness and I made two wonderfully delicious batches of cookies. The first was a no fuss Peanut Butter Cookie and the second was a more complicated, but well worth it, Oatmeal Chocolate Chip Cookie. I hope you'll try both!


Flourless Peanut Butter Cookies
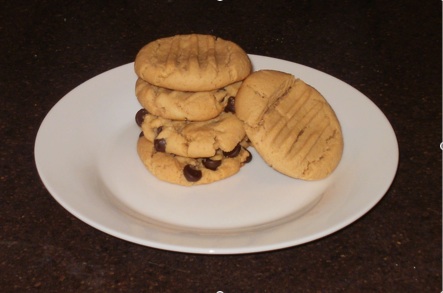


1 cup Peanut Butter (I prefer the smooth kind)
1 cup Sugar
1 egg beaten
1 tsp baking soda
1/2 c chocolate chip cookies (optional)

Mix all ingredients together and roll into balls the size of golf balls. Place on a greased cookie sheet and push ball flat with a fork. Bake for 8-10 mins at 350 F.


Gluten Free Oatcho Cookies (Oatmeal Chocolate Chip)


Preheat oven to 350 F.

1/2 c butter
1/2 c brown sugar
1/2 tsp vanilla
3/4 c gluten free all purpose flour
1/2 tsp baking soda
1/2 tsp cinnamon
1 lrg egg
1/2 tsp xantham gum
1 1/2 cup gluten free oats (fine)
1/2 c chocolate chips or raisins

Cream brown sugar and butter together. Add egg and vanilla. Mix all the dry ingredients in a separate bowl (excluding raisins or chocolate chips). Slowly add dry mixture. I used my hands to make sure all the oats made it in to the batter. Add raisins or chocolate chips. Roll into balls the size of golf balls and place on a greased cookie sheet. Flatten the balls with a fork. Bake for 10-12 mins.

Note: I used a flour that contains Xantham gum and didn't feel the need to add the additional amount this recipe calls for. If you do not add chocolate chips or raisins, I recommend including it in the recipe.

Gluten Free Bread Recipe was a flop

A few months ago, I posted a recipe for Gluten Free Bread. I was excited to try it because the blogger I borrowed it from had a tempting photo of a loaf of bread and promised it would be delicious.

My bread turned out looking similar but didn't rise as much. When I tasted an end piece, I was pleasantly surprised at how familiar the taste was. It reminded me of whole wheat bread. But as I cut in to the loaf I noticed that it looked a little uncooked and gummy. I figured it was my fault for taking the loaf out too early even though I followed the directions exactly.

I tried the recipe again and left it in for an extra 10 minutes. I still had the same problem. Too gummy in the middle of the loaf. I love the taste of this bread but not the texture.

Now some of you might enjoy a moist bread and I still recommend that you try this recipe if you're on the hunt for a good gluten free sandwich bread. However, I found that I still needed to toast every last piece for that desired texture.

I'm still going to play around with this recipe. It does call for for quite a bit of Xantham gum and I'm noticing that I'm not a fan of what the gums do to my recipes.

I'm back on the hunt for a great Gluten Free Bread.


Gluten-free market is worth more than a billion-and-a-half dollars and farmers are cashing in

I found an article about farmers finally understanding that there is a HUGE market for gluten-free grains.

Eating Without Wheat: Farmers See Market in Celiac Disease Patients

Wednesday, October 13, 2010

Gluten Free Flour Resource

Great list of all the gluten free flours on the market. I refer to it all the time for replacements, flavour descriptions, and behaviour. Hope you find it helpful!

List of Gluten Free Flours

My Gluten Free Kitchen - Flour Storage

I started experimenting with homemade gluten free foods shortly after I decided to go kick gluten out of my life. I was never a good cook. I still don't consider myself a good cook but I'm much more likely to try a new recipe or experiment with an old favourite.

I quickly realized that not all gf flours are alike. They all behave differently. They all taste different. You find out quickly which ones you use the most. I really like the warm flavour buckwheat flour brings to a recipe and I find it behaves the most like gluten-filled all-purpose flour. But it's not ideal for all recipes. I do use rice flours quite a bit but use them sparingly and try to drown the flavour out with flours like potato starch or tapioca flour.

There are many different brand name gf all-purpose flours on the market. I find most of them taste like rice so I prefer to make my own gf all-purpose flour. I think I'll end up with several types of homemade gf all-purpose flours. One for baking, one for thickening stews and sauces, and one for breads. And if I'm feeling daring, one for pastries.

Since I use my flours a lot in the kitchen, I like to keep them accessible and organized. The ones I use the most are on my spice rack in the kitchen and the ones I used less often are in marked Zip-Loc baggies in a cupboard container.

I buy all of my gluten free flours at the Bulk Barn. Most of the stores have a large selection of flours and mixes (cake, bread, brownies, etc). They also carry a selection of pre-packaged gluten free bread, cookies, pizza dough, etc.

Get to know how you maneuver around your kitchen and what flours you reach for the most. I refer to this list all the time for flour replacements, flavour descriptions, and flour behaviours.

Thanksgiving Leftover Soup


We hosted Thanksgiving this year and had too many leftovers to keep in the fridge. So we put the turkey bones in a pot of boiling water and let is simmer for 4 hours making a delicious Turkey stock. The next day, I took most of the leftover veggies and threw them in the pot with the stock (minus the bones). I added rice and turkey meat. Voila! A very simple gluten free dinner.

Saturday, October 9, 2010

Gluten Free Bread Recipe

I'm going to try this gluten free bread recipe this weekend. I hope it tastes as yummy as the blogger says it is. I'll keep you posted.

Good gluten free bread is hard to find.

Sunday, October 3, 2010

Interesting article about The Paleo Solution

Very interesting article and excerpt from the book The Paleo Solution by Robb Wolf. He proposes that we do not have the physical capabilities to process grains - of any kind. A good read and lesson on grains.

How to Keep ....

Enjoy!

All purpose Gluten Free Flour Recipe - Version 1

3 parts brown rice flour
3 parts cornstarch
2 parts sorghum flour
1 part tapioca flour

For the Heavenly Gluten Free Buckwheat Crepes I used

1/4 c rice flour
1/4 cornstarch
2 T + 2 t of sorghum flour
1 T + 1 t of tapioca flour

I also added a pinch of guar gum.

Heavenly Gluten Free Buckwheat Crepes


I'm 19 weeks pregnant and craving glutenous foods. Just the other day, I asked my boyfriend if he thought I would get sick if I licked his bagel. I miss bagels the most.

I'm lucky that my boyfriend, Mark, is very creative in the kitchen. He's taught me a lot of techniques and has given me great replacement ideas for when I cook. Ironically, it took me going gluten free to become a good cook. I have higher expectations for taste than I did in my gluten filled life. I don't like things that taste like play-dough or rice. I find most of the gluten free products out there don't taste anything like their gluten filled alternatives. I'm always on the hunt for gluten free food that taste sinfully glutenous.

This morning, Mark surprised me with the most delicious gluten free buckwheat crepes. This was my first taste of buckwheat since I've gone gluten free and was I pleasantly surprised. There's such a small amount in the recipe that it just adds a nice fullness to the flavour. I ate seven crepes. Yes, I said seven. I'd love to know what you think of these delightful treats!

Heavenly Gluten Free Buckwheat Crepes

  • 2 c Milk (I use lactose free milk)
  • 1 T Sugar
  • 1/4 T Salt
  • 3 T Butter
  • 1/2 c Buckwheat Flour
  • 3/4 c All purpose Gluten Free Flour (I use this recipe)
  • 3 Large eggs
Mix dry ingredients in medium bowl. Add milk, butter and eggs. Whisk together. The mixture should look like a runny pancake batter.

Heat pan on medium to medium-high heat. Very lightly grease pan (repeat for each crepe). Mark kept a piece of paper towel dipped in oil next the stove and wiped the pan between each crepe. Remove the pan from the heat and pour 1/8 - 1/4 of a cup of crepe batter into skillet (it should be enough to more than fill the bottom of the pan). Swirl the wet batter around the sides of the pan to get rid of the excess. Return to heat until the edges start to brown (about 45-60 seconds).

To keep the crepes warm, keep a piece of parchment paper between each crepe.

We used a strawberry sauce for a topping on a few and maple syrup on the rest. Yummmy!

Enjoy!